Fixing color issue in Fedora 26, Chrome and external monitor

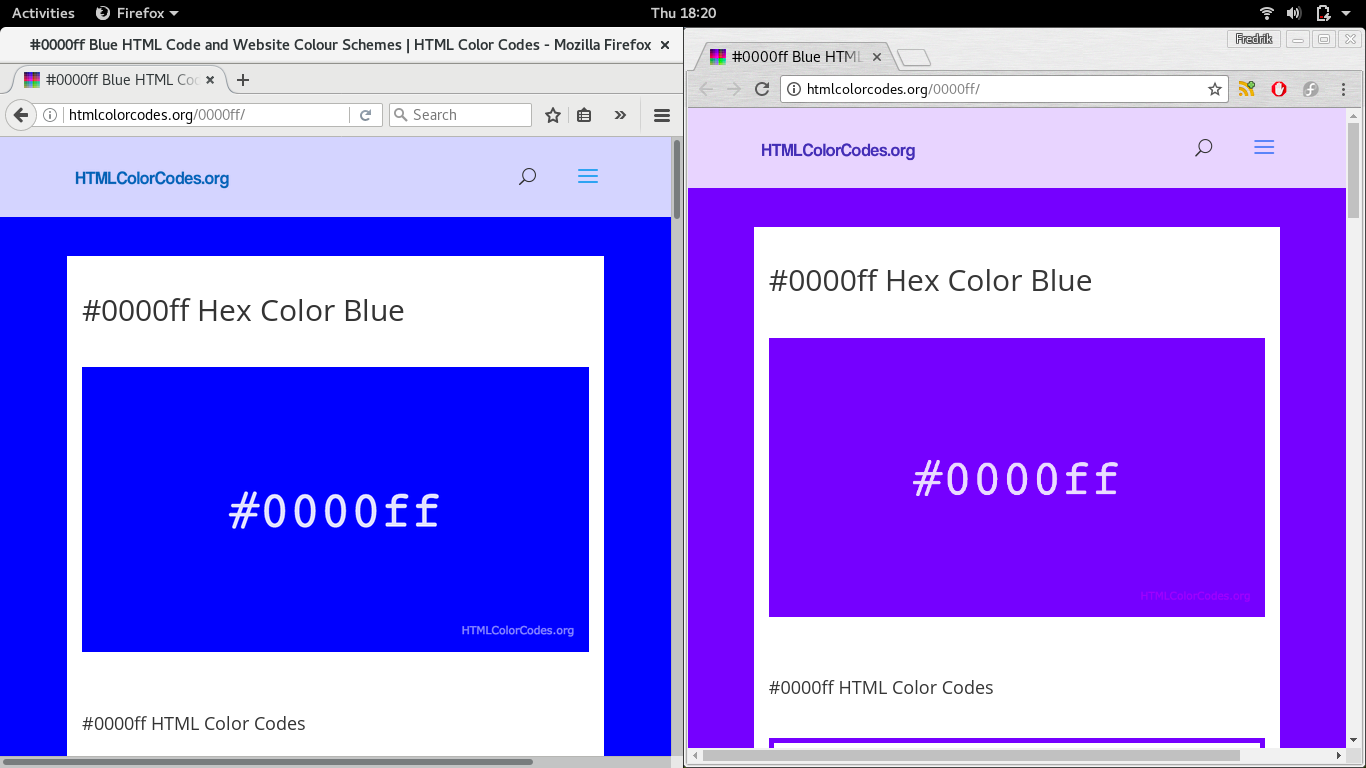
If you use Chrome version 62 under Fedora 26 and realize the blue color becomes purple on your external monitor (laptop screen is fine) then welcome to the club! My first guessing was cable – changed it with the same result, then tried different monitors with different connection methods – VGA, HDMI, USB. No luck. Then I spent some time to check my video card, google similar problem. But suddenly I put Firefox to the same external monitor and found blue color as a blue!

So, card is fine, monitor and cable are fine too. The problem with some weird settings of Chrome. Using this Reddit thread I found solution:

  • Open new tab and type there chrome://flags
  • Find option “Force color profile” and set it to “sRGB”
  • Restart Chrome and enjoy blue as blue 🙂

How to highlight SVN diff

By default Subversion shows diff without highlighting which makes a bit difficult review of big changes.

SVN

But that situation can be changed extremely simple and fast. I assume you use Fedora 17. For the other distributions you need just use different package manager, choose correct package name and find configs in the proper places.

First of all, install utility colordiff:
sudo yum install colordiff

Now you can get highlighted output of SVN diff:
svn diff foo.php | colordiff

SVN

But it isn’t convenient way. Since Subversion allows to use any external program to make a diff we just should just add following in the ~/.subversion/config:
diff-cmd = colordiff
And voilà, we can see colored diff just run ordinary SVN diff command:
svn diff foo.php

SVN

UPDATED:
To change colors in colordiff just copy its global config to your home directory and edit it:
cp /etc/colordiffrc ~/.colordiffrc
vim ~/.colordiffrc

How to get size of Mysql tables

In the previous post I wrote about a way to get a Mysql database size from Mysql shell. Now I’d like to share a way to get size of each Mysql table:
SELECT table_name,`engine` ,ROUND(data_length/1024/1024/1024,2) total_size_gb, ROUND(index_length/1024/1024/1024,2) total_index_size_gb, table_rows FROM information_schema.TABLES WHERE table_schema = 'rt3';
It’s useful if you need to know what you should clean in your huge database.

[via Techie-Gyan]

How to check Mysql database size

Recently I needed to know the size of our RT3 database. So, I found this SQL to do that from Mysql shell:

SELECT table_schema "rt3", sum( data_length + index_length ) / 1024 / 1024 / 1024 "Data Base Size in GB" FROM information_schema.TABLES GROUP BY table_schema;

The result is 360GB! We have to cleanup before upgrade to RT4. Otherwise the upgrade procedure will take ages.

[via Mysql Forum]

Configure Juniper VPN connection on Fedora 15

Recently I spent a few hours to configure VPN connection using Juniper on my Fedora 15 laptop. Actually there is nothing difficult. But I’d like to mention to one nuance. Looks like Juniper doesn’t work with openJDK Firefox plugin. It needs Sun/Oracle only! Otherwise VPN connection will be terminated immediately after start without any errors or warnings. So, here a few simple steps to configure Juniper VPN connection on your Fedora 15:

  • download and install the latest Java (choose your architecture – 32bit or 64bit);
  • install xterm – sudo yum install xterm
  • replace symlink on Java Firefox plugin – sudo ln -sf /usr/java/jdk1.6.0_25/jre/lib/i386/libnpjp2.so /usr/lib/mozilla/plugins/libjavaplugin.so
  • restart the Firefox and launch your VPN connection. It run Juniper and ask you to accept certificates as well as root password in the xterm.

That’s it. You may use VPN connection now. Additionally you can setup a script to run VPN connection as it’s described in that post.

See also

Installation of Oracle client to Ubuntu 10.04 Lucid

Recently I moved from Fedora 13 to Ubuntu 10.04 on my work laptop. So, I faced again with problem to setup Oracle PHP interface. Oracle provides RPMs only and not DEBs. So, to install the client RPMs should be converted to the DEBs. It can be done easily using utility alien:
sudo alien oracle-instantclient11.1-basic-11.1.0.7.0-1.i386.rpm
sudo alien oracle-instantclient11.1-devel-11.1.0.7.0-1.i386.rpm
sudo alien oracle-instantclient11.1-sqlplus-11.1.0.7.0-1.i386.rpm

They can be installed then with sudo dpkg -i.
Don’t forget to install PHP interface to Oracle:
sudo pear install pecl/oci8
That’s it. I spent no more 15 minutes to setup PHP Oracle interface under Ubuntu. Thanks to that post!

How to rebuild Ubuntu package from the sources

There are two ways (at least) to rebuild Ubuntu package from the source.
Using Ubuntu diff file and dpkg-buildpackage

  • Download source from Ubuntu repository.
  • Download Ubuntu diff file and apply it:
    patch -p1 < ubuntu.diff
  • Build package:
    dpkg-buildpackage -rfakeroot

Using .dsc file and debuild

  • Download .dsc file
  • Run following command:
    dpkg-source -x file.dsc
    Note, sometimes the archive with sources should be presented in the same directory!
  • Go to source directory and start building:
    debuild

In both cases the development packages should be installed first:
sudo apt-get install build-essential devscripts

Fixing GRUB bootloader on dual-boot PC

I have two versions of LinuxMCE on my HTPC – stable 0710 and developer 0810. The 0810 was installed after 0710. So, the GRUB bootloader was placed on 0810 partition. A few days ago I decided re-install 0810 from the scratch and I deleted its partition including GRUB booloader. As result I couldn’t boot 0710 anymore. Thanks to GRUB power and flexibility I was able to fix that problem and watch Champions League 🙂 The solution is simple and clear: boot from any LiveCD, drop terminal and type following command there:
sudo grub
>root (hd0,0)
>setup (hd0)

That’s it. After booting from HDD the GRUB menu was found again.